

Recipes from the Homestead kitchen
From our family’s kitchen to yours, these recipes celebrate homemade goodness, seasonal living, and old-fashioned skills made modern. Here’s a taste of what you’ll find:
• Artisan Breads – Sourdough, whole grain loaves, and quick breads made with love
• Cookies & Old-Fashioned Treats – From family favorites to crowd-pleasing classics
• Fermented Recipes – Including kefir, yogurt, cultured buttermilk, sauerkraut, and more
• Homestead Staples – Bone broth, preserved vegetables, homemade condiments, and pantry essentials
• Seasonal Favorites – Recipes for harvest season, holiday traditions, and garden abundance
Each recipe is crafted with care, using simple steps and
wholesome ingredients—just like we make them here on the homestead. We invite you to explore, experiment, and enjoy the journey of making real food from scratch.
Don’t miss a recipe! Subscribe to our newsletter for the latest seasonal ideas and kitchen favorites delivered straight to your inbox. And be sure to pin or bookmark your favorites so you can return to them anytime.

Artisan Bread Recipes
Basic Sourdough
Paige’s Homestead Sourdough (Overnight Method)
A simple, beginner-friendly sourdough recipe with an overnight rise. No kneading needed, just a few gentle stretch-and-folds.

Ingredients
For the starter:
• 60g (¼ cup) active sourdough starter
• 60g (¼ cup) unbleached bread flour
• 60g (¼ cup) lukewarm water
For the dough:
• 150g active bubbly starter (from above)
• 300g (1¼ cups) lukewarm water
• 500g (4 cups) unbleached bread flour
• 12g (2 tsp) sea salt
• Rice or gluten-free flour for dusting the bowl or basket
Instructions
1. Feed Your Starter
Mix 60g starter with 60g flour and 60g lukewarm water. Let rest 4–6 hours until bubbly, doubled, and passes the float test.
2. Make the Dough
In a large bowl, combine 150g active starter with 300g water. Mix well, then add the 500g flour and 12g salt. Stir into a shaggy, sticky dough.
3. Bulk Fermentation (Overnight)
Cover and let rise at room temperature (65–70°F) for 10–12 hours. During the first 2 hours, perform 2–3 gentle stretch-and-folds to strengthen the dough (optional).
4. Shape the Dough
In the morning, turn the dough onto a lightly misted surface and wet your hands. Gently shape into a rectangle, fold like a letter, then form into a round loaf (boule).
5. Second Rise
Place seam-side down into a parchment-lined, floured bowl or banneton. Cover and rise at room temperature for 3–4 hours.
6. Preheat & Score
30 minutes before baking, preheat oven to 450°F with Dutch oven inside. Once hot, gently score the dough and transfer it (using parchment) into the pot. NOTE. It is not strictly necessary to preheat the oven. You can optionally put the Dutch oven in a cold oven.
7. Bake
Bake covered for 20 minutes. Then reduce heat to 425°F, uncover, and bake another 20–25 minutes. Optional: remove from pot and bake 5 more minutes on oven rack for extra crisp crust.
8. Cool Completely
Let the loaf cool on a wire rack for at least 1 hour before slicing.

If your sourdough is bubbly and active, it is ready to use.
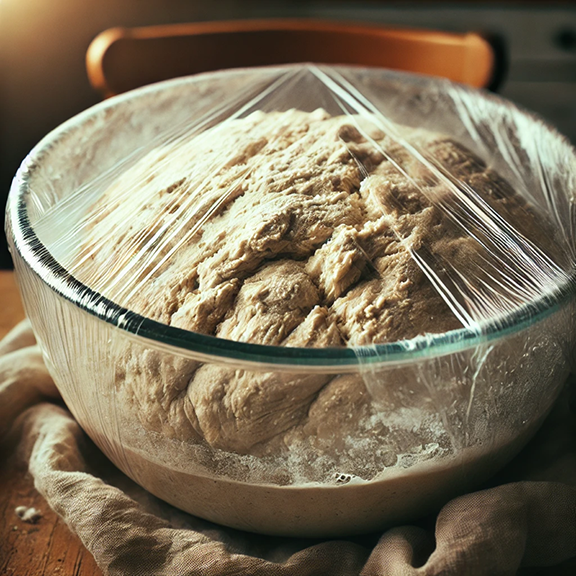
Bulk rise (first rise overnight).

Stirring flour down into your starter and water.

Smoothed dough in bowl (or banneton) for second rise.
It is surprisingly easy to make challah when you use a mixer with a dough hook to do the heavy kneading!

Ingredients
5 egg yolks
1-1/4 cup water, room temperature
1/3 cup olive oil
4-1/4 cup bread flour
1/2 cup sugar (white or brown)
1 tsp salt
1 Tbsp Bread machine yeast
1 Tbsp cardamom
1 whole egg, lightly beaten
1 Tbsp milk (beat with whole egg)
sesame seeds (optional)


Prep Time: 10 minutes
Cook Time: 45 minutes
Fermentation & Rise Time: 12–16 hours
Total Time: About 13 hours
Yield: 1 loaf (about 12 slices)
Equipment
• Mixing bowl
• Kitchen scale
• Dough whisk or spoon
• Dutch oven with lid
• Banneton or bowl lined with parchment
• Bench scraper (optional)
• Parchment paper
• Sharp knife, lame, or razor blade

Stretch

Scored


…and fold

Baked loaf (bake 10 or 15 minutes more, uncovered, for a darker crust)


Every week when Friday comes will find my house filled with the delicious smell of baking Jewish egg bread, called challah. But there’s a little something different about this aroma. It’s got a touch of cardamom in it, and it’s so mouthwatering you simply can’t wait for the evening to come to indulge.
In Scripture, the word challah didn’t originally refer to the braided loaf we recognize today, but to a portion of dough that was set aside as an offering to God. In Numbers 15:17–21, the Lord commanded the Israelites to give the first of their dough—a terumah, or sacred gift—as a remembrance that all provision comes from Him. This offering, called challah, was a way to consecrate the whole by giving a part, a recognition that every blessing begins with His hand.
Even today, when we pull a small piece from our dough before shaping loaves, we are remembering that act of holiness and gratitude. But there’s deeper meaning too: challah reminds us not only to give from what we have, but also to set ourselves apart—to live lives marked by purpose and devotion. Just as the piece of dough is separated and given to God, so too are we called to be holy, to walk in His ways, and to reflect His goodness in all we do.
The braided loaf on the Sabbath table is a symbol of unity, abundance, and the weaving together of heaven and earth. It turns a simple meal into an offering, and everyday nourishment into a reminder of the sacred calling we each carry.
The Recipe

Prep Time: 25 minutes, divided
Cook Time: 35 minutes
Fermentation & Rise Time: 3-5 hours
Yield: 2 loves
Equipment
Stand mixer with dough hook
Large glass or metal bowl
Small mixing bowl
Baking sheet or 2 loaf pans
Parchment paper
Measuring cups and spoons
Plastic wrap
Clean kitchen towel
InstructionsPut all the ingredients except the whole egg and the milk in the mixer in the order listed, making a small well in the flour for the yeast. With the dough hook fitted, turn the mixer on slowly so that the flour doesn’t go everywhere (yes, this is the voice of experience talking). Slowly increase the speed as the flour is incorporated into the other ingredients.
Let the dough hook do the mixing until the dough comes together and pulls away from the sides of the bowl. You may have to stop your mixer and scrape the sides down.
If your dough remains too sticky, add a little bit of flour at a time, up to a total of another cup. (The humidity and temperature as well as altitude of your kitchen can influence how much flour you need.)
Once the dough comes together, cover the bowl with plastic and place it in the oven with the light on but the oven off. Allow it to rise until doubled, but do not allow it to over proof. This could take up to three hours or slightly more.
When the dough has doubled in size, remove the bowl from the cold oven.
Punch the dough down.
Turn the dough out onto a lightly floured surface and divide the dough into six equal pieces. Set three aside and cover with a clean kitchen towel.
Roll each of the three remaining pieces into a long rope. Let the ropes rest for a few minutes and then roll them again.
Lay the ropes parallel to each other and pinch the ends together at one end.
Begin braiding them, crossing the right rope over the center and then the left over the center until you reach the end.
Pinch the ends together and tuck both ends under.
Repeat the process with the remaining three ropes.
If you are using a baking sheet, lay parchment on the sheet and place the loaves on the baking sheet with plenty of space between them.
If you are using loaf pans, either line them with parchment or spray them with cooking spray. Put the loaves in the pans, tucking the ends under to make sure the loaves fit.
Cover them with a clean kitchen towel and let them rise again for about 30 minutes.
While the dough is rising, preheat the oven to 350° F (65°C).
After 30 minutes, brush the tops of the loaves with the beaten egg and milk and if desired, sprinkle with sesame seeds.
Place in the preheated oven and bake for 30 - 35 minutes. the tops will be golden brown.
Remove to a cooling rack and let cool before slicing.
There are many ways to braid challah! You can use any number of strands and create intricate designs as well. For a great tutorial on braiding, take a look at this video.


How to Make Homemade Matzoh in 18 Minutes
An ancient bread for a modern world
Matzoh is one of the most ancient breads still eaten today. This crisp, unleavened flatbread has deep roots in both biblical tradition and daily Jewish life. As a Messianic believer and homesteader, I love making homemade matzoh not only during Passover, but anytime we want a quick, meaningful bread that reminds us of the Exodus story and our dependence on the Father.
If you’ve ever wondered how to make matzoh at home, the good news is—it’s incredibly simple. In fact, it’s one of the quickest breads you can make. The key is speed. From the moment water touches flour, you have just 18 minutes to get it mixed, rolled, and baked before fermentation begins. That’s what keeps it truly unleavened.
Because it contains only two ingredients—flour and water—this recipe is perfect for homesteaders, homeschool families, or anyone observing biblical feasts who wants to create something special from scratch. Plus, homemade matzoh tastes so much better than the store-bought version, and it’s a beautiful way to involve your children or grandchildren in preparing for the season.
Let’s walk through the process together.
Why Make Homemade Matzoh?
There’s something sacred about kneading dough with your own hands—especially when you know that bread has been prepared like this for thousands of years. Making matzoh at home connects us with Scripture, with our ancestors, and with one another
Here’s why we love homemade matzoh:
• It’s fast – Ready in 20 minutes or less
• It’s meaningful – Perfect for Passover and remembering the Exodus
• It’s economical – Just flour and water
• It’s flexible – Make it soft or crispy
• It’s fun – A great activity for kids
• It tastes so good – You can make it with or without salt (sometimes I add a bit of ground coriander)
A Few Helpful Tips
1. Use a hot oven – Preheat your oven to 475–500°F before you start.
2. Set a timer – Once you add water to flour, keep an eye on the 18-minute rule.
3. Work fast – Have your tools ready: bowl, rolling pin, fork or dough docker, baking sheet.
4. Keep it simple – No oil, no salt, no yeast. Just flour and water.
5. Don’t overthink it – Rustic is beautiful. Your matzoh doesn’t need to be perfectly shaped.
Homemade Matzoh Recipe
Makes: 6–8 small rounds or 4 large sheets
Prep + Bake Time: 18 minutes total
Ingredients
• 2 cups all-purpose flour (or whole wheat flour)
• ½ cup water (more or less as needed)
Optional tools:
• Rolling pin
• Dough docker or fork
• Pizza stone or baking sheet
Instructions
1. Preheat your oven to 475–500°F. Place a pizza stone or upside-down baking sheet inside to heat.
2. Mix the flour and water quickly in a large bowl. Start with ½ cup water and add more if needed. You’re aiming for a smooth, firm dough—not sticky.
3. Divide the dough into 4–8 equal pieces. Keep the ones you’re not using covered with a towel.
4. Roll out each piece as thin as possible on a lightly floured surface. The thinner it is, the crispier it will be.
5. Dock the surface using a fork to prevent bubbles. Prick all over.
6. Bake directly on the hot stone or pan for 2–3 minutes per side, flipping halfway through. It should be lightly golden and crisp around the edges.
7. Cool on a rack and enjoy immediately or store in an airtight container for up to 3 days.
Ways to Use Homemade Matzoh
• Serve it with charoset and bitter herbs for Passover
• Use it as a base for matzoh pizza
• Break it into pieces and serve with honey or fruit
• Crumble it for matzoh meal or stuffing
• Add it to your Shabbat table as a symbol of the bread of affliction
• Make Matzah Crack (Matzah Toffee Bark) - download the recipe below
Final Thoughts
Homemade matzoh is one of the easiest—and most meaningful—recipes you can make. In less than 20 minutes, you’ll have a beautiful reminder of freedom, humility, and obedience. Whether you’re keeping Passover or just want a biblical recipe to share with your family, I encourage you to try this one out.
Want more traditional recipes like this? Sign up for our newsletter, The Homestead Path, and get monthly homestead wisdom, Scripture-based inspiration, and exclusive downloads delivered straight to your inbox.
Try the recipe and let me know how it goes! I’d love to hear what traditions you’re building in your kitchen.